
CML2 自定义节点
一、Custom VM Images Overview
《Cisco Modeling Labs 2 安装&使用》一文中提到CML2还支持其他的第三方镜像,并且演示了如何新建自定义镜像。在CML2中自定义镜像需要用到两个组件,分别是Node Definitions和Image Definitions。本文将继续介绍如何创建Image Definitions以及Node Definitions,图1-1展示了这两个组件所在的位置。
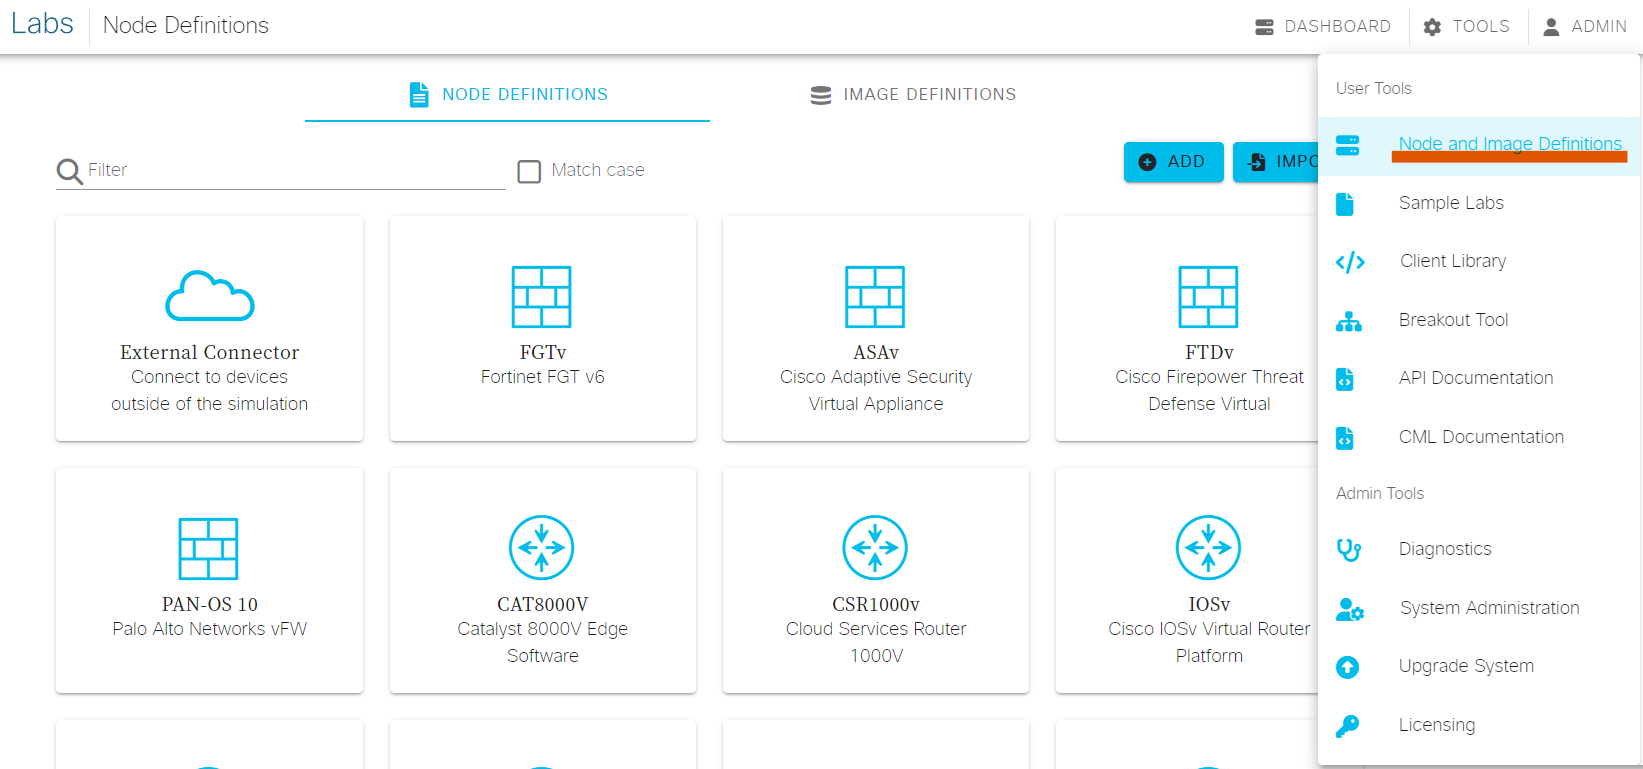 图1-1
图1-1
CML2中的Image Definitions代表了一种版本的镜像。镜像定义包括id、Label、Description、Disk Image、Node Definition,其中Disk Image所选择的镜像版本是通过MANAGE上传的,Node Definition则是用于将该Image Definition关联到某一个虚拟设备系列。
CML2中的Node Definitions代表了一种虚拟设备系列,虚拟设备系列可以存在多个版本镜像(即需要提前创建多个Image Definitions)。例如创建了一个叫ASAv的Node Definition,其关联了两个Image Definitions,分别是ASAv915、ASAv916。
二、Image Definitions
进入Node and Image Definitions后,选择IMAGE DEFINITIONS。可以在图2-1中看到8个已经定义好的Image Definitions(先不管),其中MANAGE用于管理上传的qcow2镜像,ADD用于定义新的Image Definitions。
 图2-1
图2-1
1、Upload Image
通过点击UPLOAD IMAGE选择需要上传的镜像。上传完成的镜像会在Uploaded Images中展示,如图2-2。
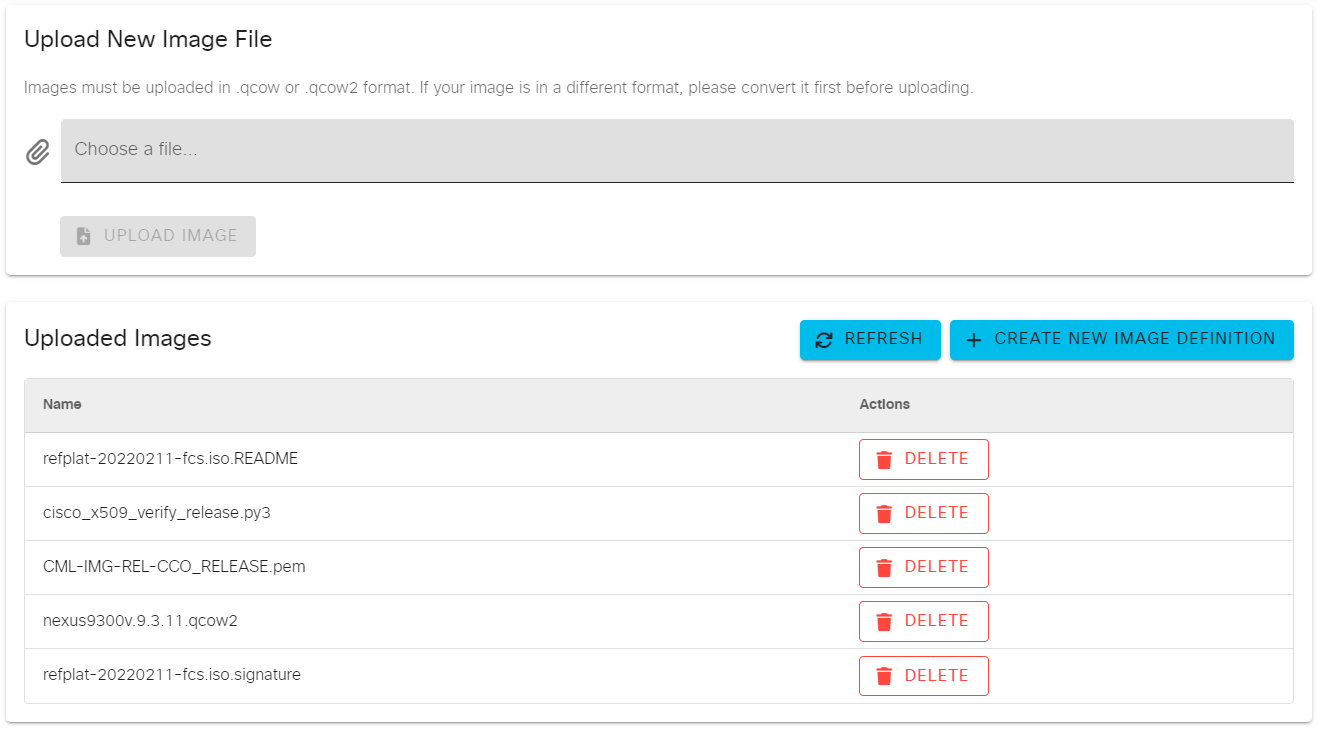 图2-2
图2-2
2、About Image Definition Parameters
开始创建Image Definition之前,需要先来了解下创建它的相关参数含义。
 图2-3
图2-3
创建Image Definition时有如下参数:
ID:CML2中的每一个镜像都具备的唯一识别码,创建ID时不可以包含空格键。
Label:标签会在CML2图形化界面中展示(在进行镜像选择时会展示),建议使用镜像系统名和版本,例如IOSv 15.6(3)。
Description:对镜像的更加详细的说明(例如镜像中的常见操作、镜像使用的硬件资源、镜像的用户名密码),该参数是可选的。
Disk Image:用于选择在Upload Image阶段上传的某一种版本的镜像。
Node Definition:选择该镜像用于关联到某一种虚拟设备系列,例如ASAv915、ASAv916被关联到ASAv虚拟设备系列。
以上参数中除Description参数外,均需要设置的。以下参数通常在Node Definition中被定义,除非多个不同版本的Image Definitions之间所需要的硬件资源不同时,才会定义这些参数,以区别对待:
Memory:此镜像所需要的内存量,通常参考镜像安装时所需的内存量。
CPUs:此镜像所需要的虚拟CPU数量,通常参考镜像安装时所需的虚拟CPU数量。
CPU Limit:从该镜像创建的虚拟机被允许使用已分配CPU的百分比,通常设置100%。CPU Limit通常用于大型拓扑中各虚拟机的启动,因为大型拓扑中通常有很多使用大量CPU的虚拟机(例如IOSv和IOSvL2),所以CPU Limit是为了防止其他镜像因为CPU资源被占用而无法开机的情况的一个保底方案。如果Boot Timeout设置120s超时,CPU Limit设置25%,那么CML会把超时值自动调整为480ms。
CML2中消耗CPU较多的镜像有两种类型:持续轮询类型以及资源密集类型。持续轮询类型的镜像主要是IOSv、IOSvL2,资源密集类型的镜像主要是IOS XRv 9000。
通过案例说明使用CPU Limit功能与否对于资源消耗的不同:通过将CPU Points作为对CPU容量的抽象表示,为每个CPU内核分配100 CPU Points。换句话说如果为CML2服务器分配了8 * vCPU,那么CML2的CPU容量则为800 CPU Points。案例展示:一个节点拥有一个CPU且没有设置CPU Limit,那么它需要100 CPU Points才能启动;一个节点拥有一个CPU且设置CPU Limit=25%,那么它需要25 CPU Points就能启动;一个节点拥有两个CPU且设置CPU Limit=25%,那么它需要50 CPU Points就能启动。
Data Disk Size:此镜像所需要的数据磁盘容量,单位为GiB,通常参考镜像安装时所需的磁盘容量。数据磁盘会被添加到虚拟机所需要的系统磁盘之外,例如SD-WAN控制器则需要将其数据库存储在第二个磁盘上。
Boot Disk Size:此镜像所需要的系统磁盘容量,单位为GiB,通常参考镜像安装时所需的磁盘容量。系统磁盘通常存放操作系统并被标记为可启动的磁盘。值得注意的是用于启动虚拟机的系统磁盘容量必须≥ qcow2 文件自身的大小,换句话说系统磁盘大小至少应该和qemu-img info报告的虚拟大小一样大。
具备以上参数后便可以成功创建一个镜像了。
三、Node Definitions
创建完Image Definitions之后,接下来开始创建Node Definition之前,需要先来了解下创建它的相关参数含义。
 图3-1
图3-1
General参数:
ID:CML2中的每一个虚拟设备系列都具备的唯一识别码,创建ID时不可以包含空格键。
Description:对虚拟设备系列的更加详细的说明,该参数是可选的。
Nature:指虚拟设备系列在网络中所扮演的角色,通常的角色有Server、Firewall、Switch、Router等。
 图3-2
图3-2
User Interface参数:
Visible:启用后Workbench->Add Nodes会显示该虚拟设备系列,通常启用。
Description:对节点定义的描述,支持Markdown格式,可选参数。
Prefix:使用该节点创建的虚拟机会带一个默认的命名前缀,该参数就是用于创建默认命名前缀的。通常的格式为虚拟设备系列加上一个"-",例如某节点前缀为asav-,则创建三台asav虚拟机的命名分别是asav-1、asav-2、asav-3。
Icon:用于指定该节点的图标,通常和Nature参数相对应。
Label:用于在Workbench->Add Nodes中显示标签名。
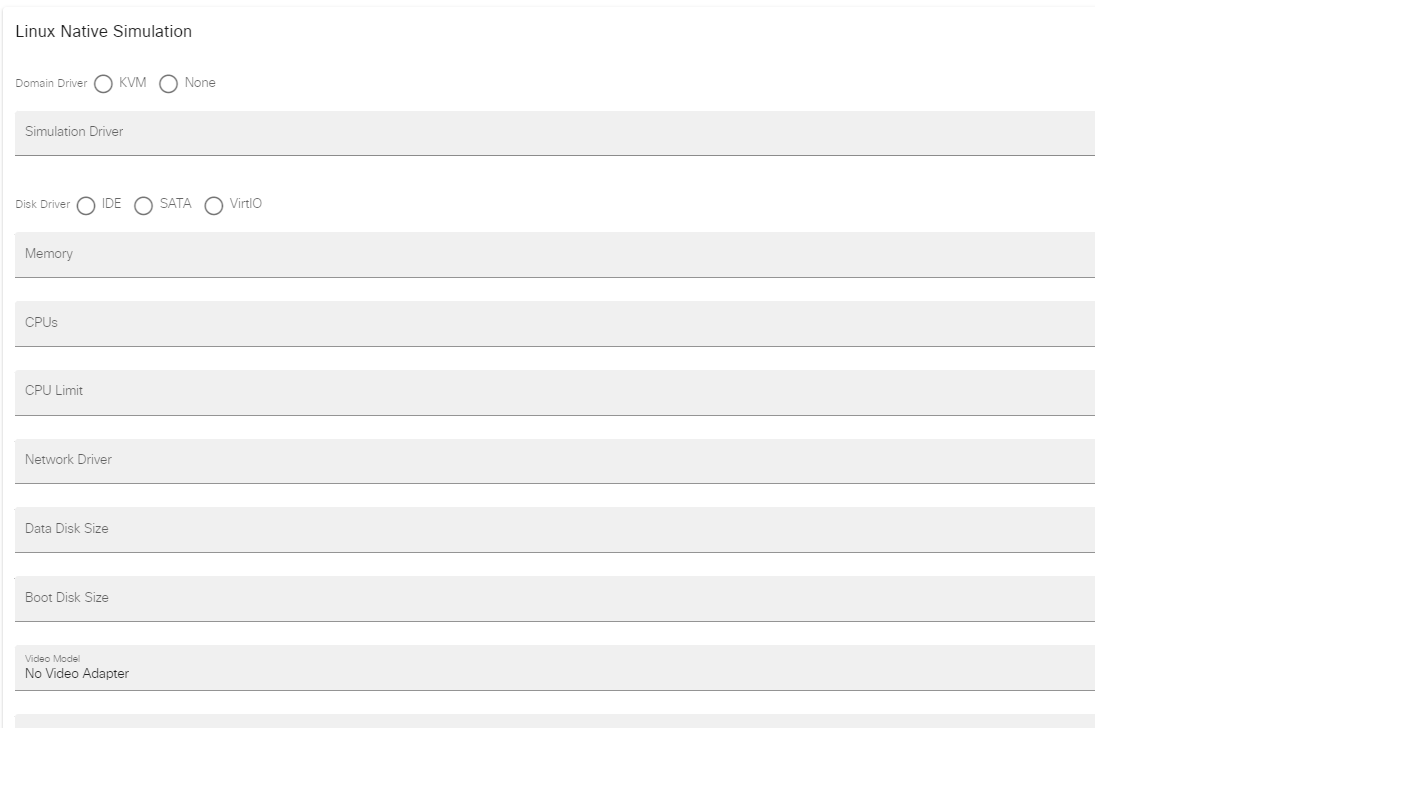 图3-3
图3-3
Linux Native Simulation参数:该部分的参数用于描述所有虚拟化属性。
Domain Driver:此节点的虚拟化驱动,始终选择KVM。
Simulation Driver:CML仿真驱动配置文件;该参数通常选择Server,Nexus 9000v的自定义节点驱动配置文件请选择nxosv9000。
Disk Driver:此节点的磁盘驱动,通常参考镜像安装时所需的磁盘驱动。
Memory:参考Image Definition中的Memory参数释义。
CPUs:参考Image Definition中的CPUs参数释义。
CPU Limit:参考Image Definition中的CPU Limit参数释义。
Network Driver:此节点的网卡驱动,通常参考镜像安装时所需的网卡驱动。
Data Disk Size:参考Image Definition中的Data Disk Size参数释义,该参数可选。
Boot Disk Size:参考Image Definition中的Boot Disk Size参数释义,该参数可选。
Video Model(可选):此节点的显卡,通常选择默认值,某些节点可能需要设置特定型号(可供选择的显卡类型std、cirrus、vmware、qxl、xenfb、tcx、cg3、virtio、none)。
对于有图形化需求的节点,可以设置Standard VGA 或 Cirrus VGA(设置完成后,CML2会提供VNC选项);
对于仅依赖串口控制台需求的节点,直接选择none。
Video Memory(可选):设置了Video Model后,需要设置显存,单位为MiB。显存值必须设置为非零值,通常设置为16/32MiB够用即可。
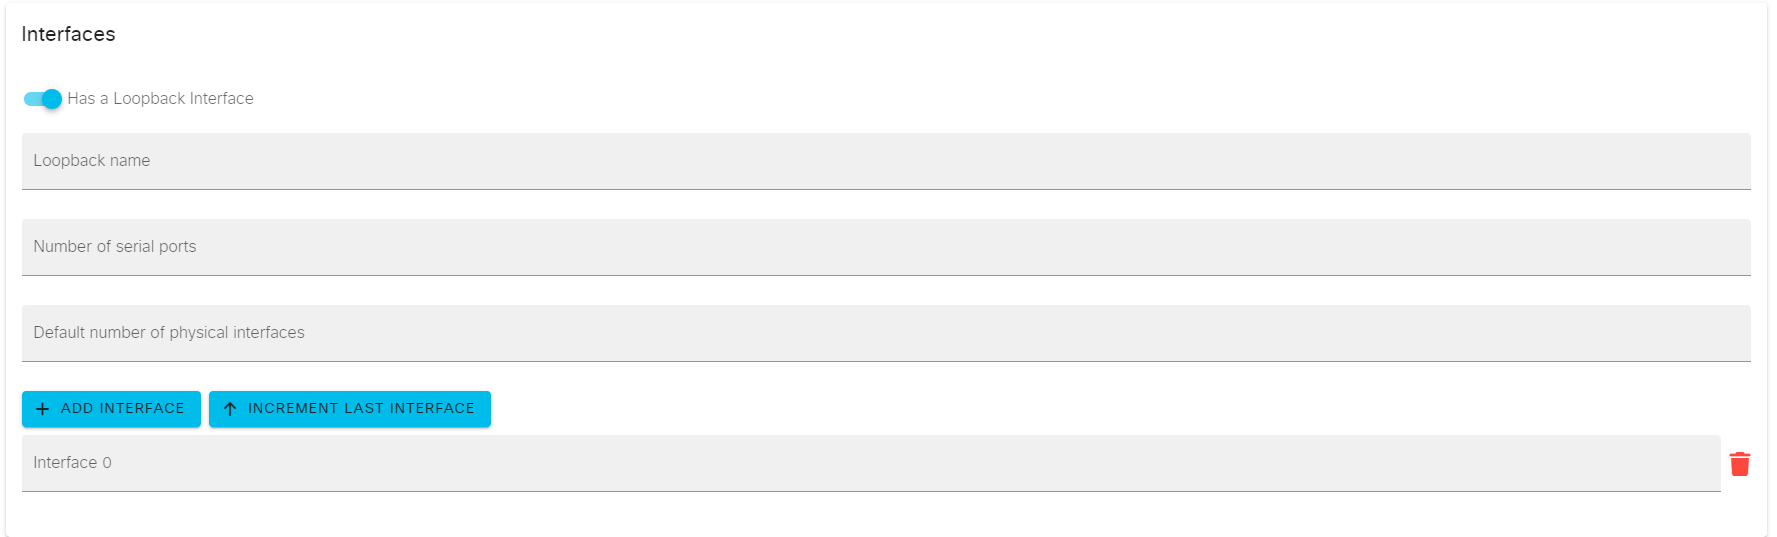 图3-4
图3-4
Interfaces参数:该参数需要参考镜像安装时的默认接口数、最大接口数、接口命名规则。
Has a Loopback Interface:此节点如果应该需要Loopback接口则启用它,反之禁用。
Loopback Name:Loopback接口名;例如Linux下的Loopback名为lo,该参数可选。
Number of serial ports:虚拟机串行接口总数;即使没有串行接口,该值也不应该为0,该值范围1-8。一般情况下思科设备具备2个串行接口,分别是Console和AUX,Linux可以使用串行接口做文本控制台,如果镜像安装时特别注明多个串行接口时需要按照说明填入数值。
Default number of physical interfaces:默认物理接口数,该值参阅对应的镜像安装需求。
最后设置该节点在CML2图形化界面中的接口,接口数量和命名规则按照实际Image中规定的来:
接口数量:如果接口数量镜像中定义了4个,但是你在此处只命名了3个,那么CML2图形化界面中就只显示3个接口。
接口命名规则:不同的设备或相同设备不同速率的接口命名规则不同。例如思科万兆光口TenGigE0/0、数据中心交换机Ethernet0/0,Linux接口eth0等。注意此字段填充的字符长度有要求。
 图3-5
图3-5
Boot参数:节点在启动时的一些设置,通过设置Timeout和ADD BOOT LINE参数可以使得节点启动完成后状态显示☑️。
Timeout:节点从启动中(节点状态显示🔄)到启动完成前(节点状态显示☑️)所需等待的最长时间,单位为秒。
ADD BOOT LINE:CML2会检查节点的Console控制台,如果出现引导行字符串就会认为节点已经启动完成,那么这个引导行字符串就是在该参数中定义。以下为案例:
例1:IOSv启动过程中,如果检查到Console控制台字符串为 %PLATFORM-5-SIGNATURE_VERIFIED: 和 Would you like to enter the initial configuration dialog? 时就会被判断为节点启动完成。
例2:USG启动过程中,如果检查到Console控制台字符串为 Loading /boot/busybox-initrd-static...ok 时就会被判断为节点启动完成。
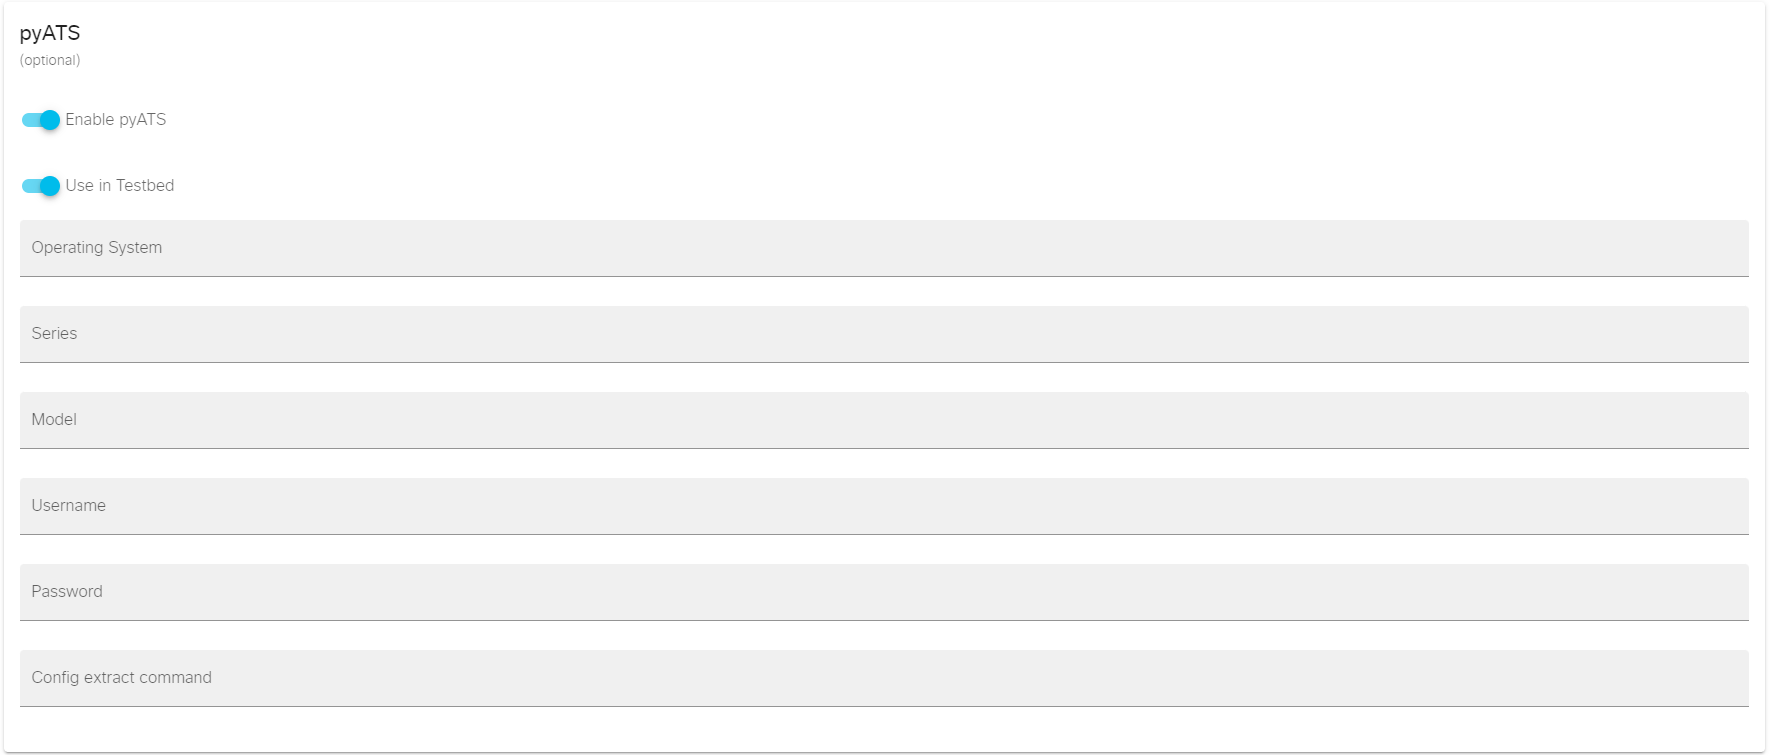 图3-6
图3-6
pyATS参数:pyATS 是思科公司推出的开源 Python 框架,用于创建和运行自动化网络测试。CML2提供了pyats_testbed API,可以为Lab生成测试平台定义,以便与pyATS测试一同使用。为节点定义启用pyATS支持和在测试平台中使用,CML2就会在Lab的pyATS测试平台中包含与该节点定义相关的节点,并填写所有正确的设备特定参数。
注意如果要在此节点定义相关的节点上使用配置提取,则必须启用pyATS。如果不打算使用pyATS进行配置提取以外的其他操作,可以启用"Enable pyATS",并禁用"Use in Testbed"。
Enable pyATS:如果 pyATS 支持这种类型的设备,请启用pyATS功能,否则禁用。
Use in Testbed:如果启用,则此节点定义相关的节点将显示在导出的测试平台定义中;如果禁用,该设备将从pyATS测试平台中省略。
Operating System:根据pyATS定义的操作系统名称。例如IOSv操作系统类型就是"ios"。
Series:设备系列,该参数可选且通常不需要设置。
Model:设备型号,该参数可选且通常不需要设置。
Username:pyATS登录设备时的登录名。
Password:pyATS登录设备时的密码。
Config extract command:从Lab中使用Extract Configuration功能提取节点当前配置时,CML将在与此节点相关联的节点上使用此配置提取命令。需要先Enable pyATS。如果有命令可以获取节点的当前配置,请在此处输入该命令。
有关pyATS支持的设备、操作系统、系列、型号参考official pyATS/Unicon documentation.
 图3-7
图3-7
Property Inheritance参数:默认情况下Lab中新建的节点会采用Node Definition中定义的值,而属性继承参数可以使得节点定义继承Image Definition或者通过节点定义的单个节点属性值。对于继承的属性,CML2首先检查该属性是否在节点上设置,是的话直接使用该值,否则检查Image Definition中定义的值,如果Image Definition中没有该值的定义则会使用Node Definition中定义的该值。
举个粒子:假设IOSv's Node Definition指定RMA为512 MiB,如果Image Definition中定义的是需要768 MiB RMA的IOSv版本的镜像,最后创建的节点将以Image Definition中定义的768 MiB为RAM设置。如果在Lab中通过单个节点的属性修改为1024 MiB,那么该节点将以1024 MiB的RAM来运行,当然此方式只适用于该节点,不适用于采用节点定义的其他节点的值或者Image Definition中定义的值。
可以继承的属性有:RAM、CPUs、CPU Limit、Boot Disk Size、Data Disk Size。
CML2为节点提供基本的存根配置(stub configurations),根据节点类型可以生成配置(主机名、激活接口、用户配置、登录配置,不支持生成IP和任何路由协议及高级配置)。Configuration Generator主要负责存根配置,Configuration Generator仅为clean Nodes和wiped但是尚未启动的节点生成配置。
Ubuntu和Core OS的存根配置可以直接利用cloud-init配置,参阅 cloud-init configuration examples。
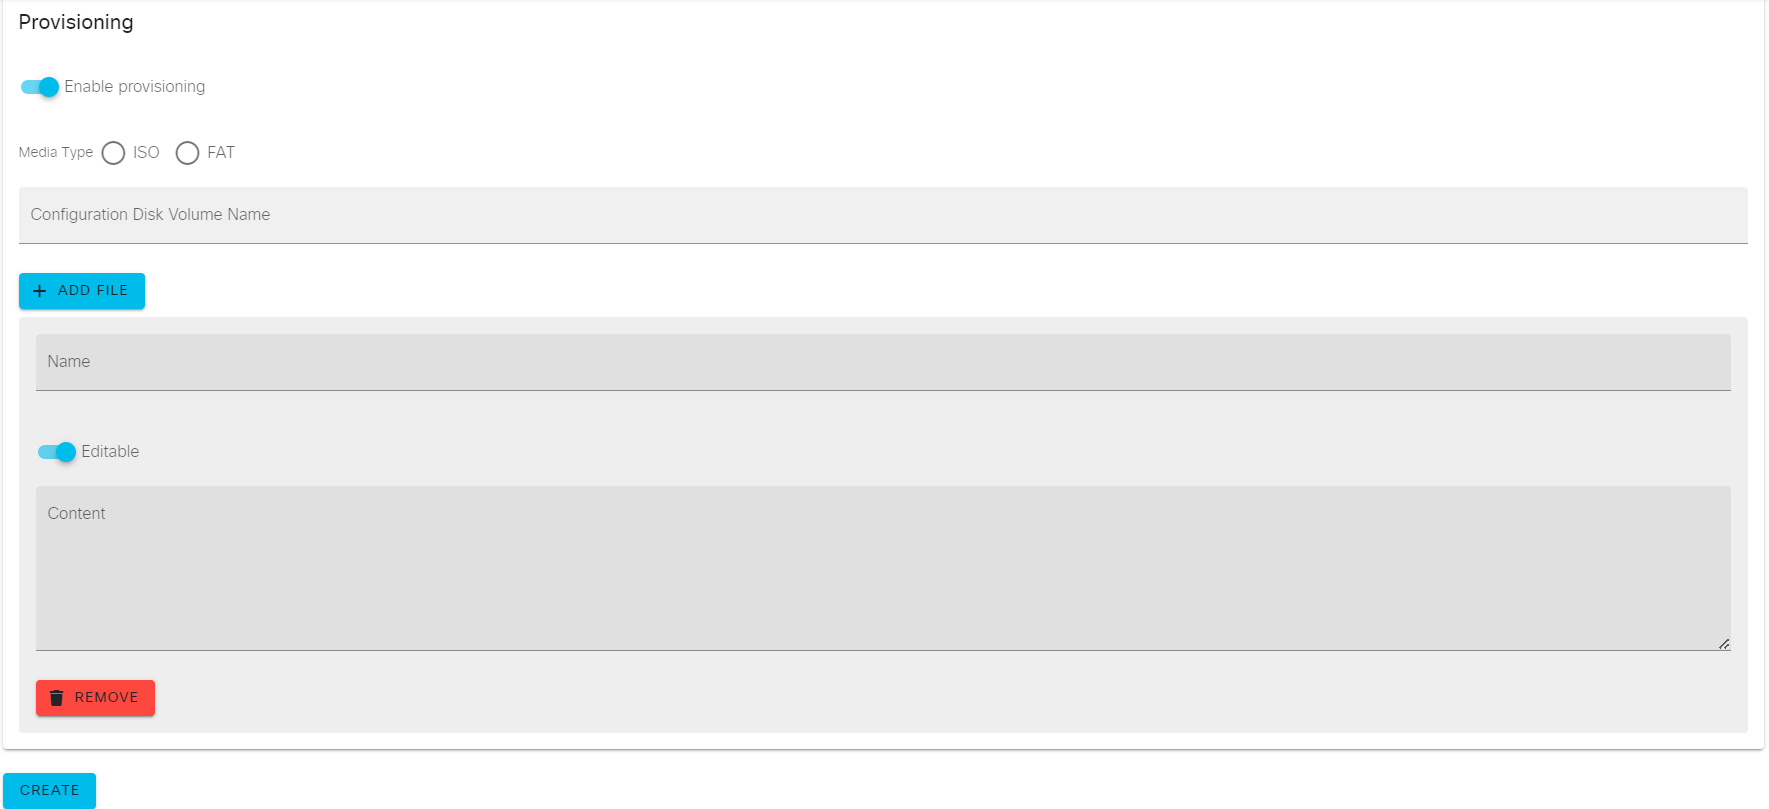 图3-8
图3-8
Provisioning参数:如果设备配置了Bootstrap Configuration,需要在此处指定配置的详细信息(建议查阅相关镜像安装和配置文档,了解引导配置如何工作)。
Enable provisioning:启用Provisioning,CML2将采用此处或Workbench ->Node's Config选项卡指定的引导配置,将其转换成节点虚拟机内的ISO9660(CD-ROM)或FAT卷。节点虚拟机启动后,会从该卷中读取数据并执行所有初始化配置。
Media Type:用于存储初始化配置的数据卷类型。提供两种选项,分别是ISO9660和FAT,该参数根据相关镜像安装和配置文档推荐选择。
Configuration Disk Volume Name:数据卷的名称。通常命名为disk。
ADD FILE参数:
Name:初始化配置命名。
Content:初始化配置内容。
四、Cases
通过例举相关用例,熟悉Node Definitions和Image Definitions的操作。
1、Cisco Catalyst 8000v
Catalyst 8000v 所需的硬件资源:
≥ 1 vCPU
≥ 4 RAM(GiB)
从 Catalyst 8000v Download 下载包含"-serial"字段的镜像,而不是EFI镜像。
以下是Catalyst 8000v ‘s Node Definition:
id: cat8000v
configuration:
  generator:
    driver: csr1000v
  provisioning:
    volume_name: disk
    media_type: iso
    files:
      - name: iosxe_config.txt
        content: |-
          platform console serial
          !
          hostname insert_hostname_here
          !
          !
          !
          !
          !
          !
          !
          end
        editable: true
inherited:
  image:
    ram: true
    cpus: true
    data_volume: false
    boot_disk_size: false
    cpu_limit: true
  node:
    ram: true
    cpus: true
    data_volume: false
    boot_disk_size: false
    cpu_limit: true
device:
  interfaces:
    has_loopback_zero: true
    default_count: 4
    loopback:
      - Loopback0
    physical:
      - GigabitEthernet1
      - GigabitEthernet2
      - GigabitEthernet3
      - GigabitEthernet4
      - GigabitEthernet5
      - GigabitEthernet6
      - GigabitEthernet7
      - GigabitEthernet8
      - GigabitEthernet9
      - GigabitEthernet10
      - GigabitEthernet11
      - GigabitEthernet12
      - GigabitEthernet13
      - GigabitEthernet14
      - GigabitEthernet15
      - GigabitEthernet16
      - GigabitEthernet17
      - GigabitEthernet18
      - GigabitEthernet19
      - GigabitEthernet20
      - GigabitEthernet21
      - GigabitEthernet22
      - GigabitEthernet23
      - GigabitEthernet24
      - GigabitEthernet25
      - GigabitEthernet26
    serial_ports: 2
general:
  description: Catalyst 8000V Edge Software
  nature: router
  read_only: false
schema_version: 0.0.1
sim:
  linux_native:
    cpus: 1
    disk_driver: virtio
    driver: csr1000v
    libvirt_domain_driver: kvm
    nic_driver: virtio
    ram: 4096
    cpu_limit: 100
boot:
  timeout: 250
  completed:
    - Would you like to enter the initial configuration dialog?
    - Press RETURN to get started!
    - '%CVAC-4-CONFIG_DONE:'
pyats:
  os: iosxe
  series: csr1000v
  config_extract_command: show run
  use_in_testbed: true
ui:
  description: |-
    Catalyst 8000V Edge Software

    4 GB DRAM, 1 vCPU

    [CCO Link](https://www.cisco.com/c/en/us/products/routers/catalyst-8000v-edge-software/index.html)
  group: Cisco
  icon: router
  label: CAT8000V
  label_prefix: cat8000v-
  visible: true
2、Cisco Catalyst 9800
Catalyst 9800 所需的硬件资源:
≥ 2 vCPU
≥ 8 RAM(GiB)
从 Catalyst 9800 Download 下载镜像。
以下是Catalyst 9800 ‘s Node Definition:
id: cat9800
configuration:
  generator:
    driver: csr1000v
  provisioning:
    volume_name: disk
    media_type: iso
    files:
      - name: iosxe_config.txt
        content: hostname inserthostname_here
        editable: true
device:
  interfaces:
    has_loopback_zero: true
    default_count: 4
    loopback:
      - Loopback0
    physical:
      - GigabitEthernet1
      - GigabitEthernet2
      - GigabitEthernet3
      - GigabitEthernet4
      - GigabitEthernet5
      - GigabitEthernet6
      - GigabitEthernet7
      - GigabitEthernet8
    serial_ports: 2
inherited:
  image:
    ram: true
    cpus: true
    data_volume: false
    boot_disk_size: false
  node:
    ram: true
    cpus: true
    data_volume: false
    boot_disk_size: false
general:
  description: Cisco Catalyst 9800 Wireless Controller for Cloud
  nature: switch
  read_only: true
schema_version: 0.0.1
boot:
  timeout: 300
  completed:
    - 'Would you like to enter the initial configuration dialog? [yes/no]:'
    - '%SYS-5-RESTART: System restarted'
    - 'INFO: Press RETURN to get started!'
sim:
  linux_native:
    cpus: 2
    disk_driver: virtio
    driver: server
    libvirt_domain_driver: kvm
    nic_driver: virtio
    ram: 8192
    video:
      memory: 16
pyats:
  os: iosxe
  series: csr1000v
  config_extract_command: show run
ui:
  description: |-
    Cisco Catalyst 9800 Wireless Controller for Cloud

    8 GB DRAM, 2 vCPU

    [CCO Link](https://www.cisco.com/c/en/us/support/wireless/catalyst-9800-wireless-controllers-cloud/tsd-products-support-series-home.html)
  group: Others
  icon: access_point
  label: Cat9800
  label_prefix: cat9800-
  visible: true
3、FortiGate v6
FGT v6 所需的硬件资源:
≥ 1 vCPU
≥ 1 RAM(GiB)
以下是FGT v6 ‘s Node Definition:
id: fortigate
boot:
  timeout: 60
  completed:
    - FortiGate-VM64-KVM login
configuration:
  generator:
    driver: null
  provisioning:
    files:
      - name: meta-data
        content: ''
        editable: true
    media_type: iso
    volume_name: disk
device:
  interfaces:
    default_count: 4
    has_loopback_zero: false
    physical:
      - port1
      - port2
      - port3
      - port4
      - port5
      - port6
      - port7
      - port8
      - port9
      - port10
      - port11
      - port12
      - port13
      - port14
      - port15
      - port16
    serial_ports: 1
general:
  description: FortiGate Next Generation Firewall
  nature: firewall
  read_only: true
inherited:
  image:
    boot_disk_size: false
    cpus: true
    data_volume: true
    ram: true
  node:
    boot_disk_size: false
    cpus: true
    data_volume: true
    ram: true
pyats:
  os: linux
schema_version: 0.0.1
sim:
  linux_native:
    cpus: 1
    data_volume: 32
    disk_driver: virtio
    driver: server
    libvirt_domain_driver: kvm
    nic_driver: virtio
    ram: 1024
ui:
  description: |-
    FortiGate Next Generation Firewall

    1,024 MB DRAM, 1 vCPU
  group: Others
  icon: firewall
  label: FortiGate
  label_prefix: fortigate-
  visible: true
4、F5 BIGIP-VE
F5 BIGIP-VE 所需的硬件资源:
≥ 4 vCPU
≥ 4 RAM(GiB)
以下是F5 BIGIP-VE ‘s Node Definition:
id: f5-bigip-ve
general:
  nature: server
  read_only: false
  description: F5 BIGIP Virtual Edition
device:
  interfaces:
    has_loopback_zero: false
    physical:
      - eth0
      - eth1
      - eth2
      - eth3
      - eth4
      - eth5
      - eth6
      - eth7
      - eth8
      - eth9
      - eth10
      - eth11
      - eth12
      - eth13
      - eth14
      - eth15
      - eth16
      - eth17
      - eth18
      - eth19
      - eth20
      - eth21
      - eth22
      - eth23
      - eth24
      - eth25
      - eth26
      - eth27
    serial_ports: 1
    default_count: 4
ui:
  visible: true
  label_prefix: bigip-
  icon: server
  label: F5 BIGIP-VE
  description: BIG-IP VE Appliance
sim:
  linux_native:
    libvirt_domain_driver: kvm
    driver: server
    disk_driver: virtio
    ram: 4096
    cpus: 4
    nic_driver: virtio
    video:
      memory: 1
boot:
  timeout: 600
  completed:
    - 'login: '
inherited:
  image:
    ram: true
    cpus: true
    data_volume: false
    boot_disk_size: false
  node:
    ram: true
    cpus: true
    data_volume: false
    boot_disk_size: false
configuration:
  generator:
    driver: null
  provisioning:
    volume_name: config-2
    media_type: iso
    files:
      - name: user_data
        editable: true
        content: |-
          #cloud-config

          write_files:
            - path: /config/onboarding/day0.sh
               permissions: 0755
               owner: root:root
               content: |
                 #!/bin/sh
                 tmsh modify sys global-settings hostname mybigip.example.com

          runcmd: [nohup sh -c '/config/onboarding/day0.sh' &]
      - name: meta_data.json
        editable: true
        content: '{ "uuid": "1d9d6d3a-1d36-4db7-8d7c-63963d4d6f20", "hostname": "localhost"
          }'
schema_version: 0.0.1
5、Cisco WSA
Cisco WSA S100V 所需的硬件资源:
≥ 3 vCPU
≥ 8 RAM(GiB)
从Cisco WSA Download下载镜像。
以下是Cisco WSA ‘s Node Definition:
id: wsa
general:
  description: Cisco Web Security Appliance (WSA)
  nature: server
  read_only: false
device:
  interfaces:
    has_loopback_zero: true
    physical:
      - enp6s0
      - enp6s1
      - enp6s2
      - enp6s3
    serial_ports: 2
    default_count: 4
    loopback:
      - loopback
ui:
  visible: true
  label_prefix: wsa-
  icon: server
  label: WSA
  description: |-
    Cisco Web Security Appliance (WSA)
    8192 MB RAM, 3 vCPUs
sim:
  linux_native:
    libvirt_domain_driver: kvm
    driver: server
    disk_driver: ide
    ram: 8192
    cpus: 3
    cpu_limit: 100
    nic_driver: virtio
boot:
  timeout: 300
inherited:
  image:
    ram: true
    cpus: true
    cpu_limit: true
    data_volume: true
    boot_disk_size: true
  node:
    ram: true
    cpus: true
    cpu_limit: true
    data_volume: true
    boot_disk_size: true
configuration:
  generator:
    driver: server
  provisioning:
    volume_name: cidata
    media_type: iso
    files:
      - name: config.xml
        editable: true
        content: |-
          <?xml version="1.0" encoding="ISO-8859-1"?>
          <!DOCTYPE config SYSTEM "config.dtd">
          <config>

          </config>
schema_version: 0.0.1
6、Cisco Nexus 9500
Cisco Nexus 9500 148 Ports所需的硬件资源:
≥ 4 vCPU
≥ 16 RAM(GiB)
从 Cisco Nexus 9500 下载镜像。
以下是Cisco Nexus 9500 ‘s Node Definition:
id: nxosv9500-148
configuration:
  generator:
    driver: nxosv9000
  provisioning:
    volume_name: disk
    media_type: iso
    files:
      - name: nxos_config.txt
        editable: true
        content: |-
          #insert hostname
          platform insert module 2 linecard N9K-X9516v

          platform insert module 3 linecard N9K-X9532v

          platform insert module 4 linecard N9K-X9536v
device:
  interfaces:
    has_loopback_zero: true
    default_count: 4
    loopback:
      - Loopback0
    management:
      - mgmt0
    physical:
      - mgmt0
      - Ethernet1/1
      - Ethernet1/2
      - Ethernet1/3
      - Ethernet1/4
      - Ethernet1/5
      - Ethernet1/6
      - Ethernet1/7
      - Ethernet1/8
      - Ethernet1/9
      - Ethernet1/10
      - Ethernet1/11
      - Ethernet1/12
      - Ethernet1/13
      - Ethernet1/14
      - Ethernet1/15
      - Ethernet1/16
      - Ethernet1/17
      - Ethernet1/18
      - Ethernet1/19
      - Ethernet1/20
      - Ethernet1/21
      - Ethernet1/22
      - Ethernet1/23
      - Ethernet1/24
      - Ethernet1/25
      - Ethernet1/26
      - Ethernet1/27
      - Ethernet1/28
      - Ethernet1/29
      - Ethernet1/30
      - Ethernet1/31
      - Ethernet1/32
      - Ethernet1/33
      - Ethernet1/34
      - Ethernet1/35
      - Ethernet1/36
      - Ethernet1/37
      - Ethernet1/38
      - Ethernet1/39
      - Ethernet1/40
      - Ethernet1/41
      - Ethernet1/42
      - Ethernet1/43
      - Ethernet1/44
      - Ethernet1/45
      - Ethernet1/46
      - Ethernet1/47
      - Ethernet1/48
      - Ethernet1/49
      - Ethernet1/50
      - Ethernet1/51
      - Ethernet1/52
      - Ethernet1/53
      - Ethernet1/54
      - Ethernet1/55
      - Ethernet1/56
      - Ethernet1/57
      - Ethernet1/58
      - Ethernet1/59
      - Ethernet1/60
      - Ethernet1/61
      - Ethernet1/62
      - Ethernet1/63
      - Ethernet1/64
      - Ethernet2/1
      - Ethernet2/2
      - Ethernet2/3
      - Ethernet2/4
      - Ethernet2/5
      - Ethernet2/6
      - Ethernet2/7
      - Ethernet2/8
      - Ethernet2/9
      - Ethernet2/10
      - Ethernet2/11
      - Ethernet2/12
      - Ethernet2/13
      - Ethernet2/14
      - Ethernet2/15
      - Ethernet2/16
      - Ethernet3/1
      - Ethernet3/2
      - Ethernet3/3
      - Ethernet3/4
      - Ethernet3/5
      - Ethernet3/6
      - Ethernet3/7
      - Ethernet3/8
      - Ethernet3/9
      - Ethernet3/10
      - Ethernet3/11
      - Ethernet3/12
      - Ethernet3/13
      - Ethernet3/14
      - Ethernet3/15
      - Ethernet3/16
      - Ethernet3/17
      - Ethernet3/18
      - Ethernet3/19
      - Ethernet3/20
      - Ethernet3/21
      - Ethernet3/22
      - Ethernet3/23
      - Ethernet3/24
      - Ethernet3/25
      - Ethernet3/26
      - Ethernet3/27
      - Ethernet3/28
      - Ethernet3/29
      - Ethernet3/30
      - Ethernet3/31
      - Ethernet3/32
      - Ethernet4/1
      - Ethernet4/2
      - Ethernet4/3
      - Ethernet4/4
      - Ethernet4/5
      - Ethernet4/6
      - Ethernet4/7
      - Ethernet4/8
      - Ethernet4/9
      - Ethernet4/10
      - Ethernet4/11
      - Ethernet4/12
      - Ethernet4/13
      - Ethernet4/14
      - Ethernet4/15
      - Ethernet4/16
      - Ethernet4/17
      - Ethernet4/18
      - Ethernet4/19
      - Ethernet4/20
      - Ethernet4/21
      - Ethernet4/22
      - Ethernet4/23
      - Ethernet4/24
      - Ethernet4/25
      - Ethernet4/26
      - Ethernet4/27
      - Ethernet4/28
      - Ethernet4/29
      - Ethernet4/30
      - Ethernet4/31
      - Ethernet4/32
      - Ethernet4/33
      - Ethernet4/34
      - Ethernet4/35
      - Ethernet4/36
    serial_ports: 2
inherited:
  image:
    ram: true
    cpus: true
    data_volume: false
    cpu_limit: true
    boot_disk_size: false
  node:
    ram: true
    cpus: true
    cpu_limit: true
    data_volume: false
    boot_disk_size: false
general:
  description: Cisco Nexus 9500v Switch 148 Ports
  nature: switch
  read_only: false
schema_version: 0.0.1
sim:
  linux_native:
    cpus: 4
    disk_driver: sata
    driver: nxosv9000
    efi_boot: true
    libvirt_domain_driver: kvm
    nic_driver: e1000
    ram: 16384
    cpu_limit: 100
boot:
  timeout: 480
  completed:
    - There is no admin password in the bootstrap file
    - User Access Verification
pyats:
  os: nxos
  series: n9k
  config_extract_command: show run
  use_in_testbed: true
ui:
  description: |-
    Cisco Nexus 9500v Switch with 148 Ports
    Line cards inserted in the following sequence
    Module 1 Nexus 9500v 64 port Ethernet1/1 - Ethernet1/64 (Default)
    Module 2 Nexus 9500v 16 port Ethernet2/1 - Ethernet2/16
    Module 3 Nexus 9500v 32 port Ethernet3/1 - Ethernet3/32
    Module 4 Nexus 9500v 36 port Ethernet4/1 - Ethernet4/36

    Requires 16 GB DRAM, 4 vCPUs
  group: Cisco
  icon: switch
  label: NX-OS 9500-148
  label_prefix: nxos9500-148-
  visible: true
If you need to add more node definitions, please see the public to cml-community repository download additional node definitions or to share ones you have created.
评论